저는 gcloud-sdk를 이용하여 Cloud Shell에서 작업을 진행했습니다. 아래와 같이 CLoud Shell에 원격 접속 후 GKE 클러스터에 대한 권한을 받아옵니다
h43254@cloudshell:/etc (nasa1515-nov2)$ gcloud config set compute/zone us-central1-f
Updated property [compute/zone].
h43254@cloudshell:/etc (nasa1515-nov2)$
h43254@cloudshell:/etc (nasa1515-nov2)$ gcloud container clusters get-credentials c-dcn6h
Fetching cluster endpoint and auth data.
kubeconfig entry generated for c-dcn6h.
h43254@cloudshell:/etc (nasa1515-nov2)$ kubectl get nodes
NAME                                  STATUS   ROLES    AGE     VERSION
gke-c-dcn6h-default-0-41c99d2b-b3hf   Ready    <none>   2d21h   v1.17.12-gke.1501
gke-c-dcn6h-default-0-41c99d2b-zkp7   Ready    <none>   2d21h   v1.17.12-gke.1501
그 후 아래 명령어로 외부 고정 IP를 생성해줍니다
h43254@cloudshell:~ (nasa1515-nov2)$ gcloud compute addresses create app-lb
For the following address:
- [test-lb-ip]
choose a region or global:
[1] global
[2] region: asia-east1
[3] region: asia-east2
[4] region: asia-northeast1
[5] region: asia-northeast2
[6] region: asia-northeast3
[7] region: asia-south1
[8] region: asia-southeast1
[9] region: asia-southeast2
[10] region: australia-southeast1
[11] region: europe-north1
[12] region: europe-west1
[13] region: europe-west2
[14] region: europe-west3
[15] region: europe-west4
[16] region: europe-west6
[17] region: northamerica-northeast1
[18] region: southamerica-east1
[19] region: us-central1
[20] region: us-east1
[21] region: us-east4
[22] region: us-west1
[23] region: us-west2
[24] region: us-west3
[25] region: us-west4
Please enter your numeric choice:  19

Created [https://www.googleapis.com/compute/v1/projects/nasa1515-nov2/regions/us-central1/addresses/app-lb].
h43254@cloudshell:~ (nasa1515-nov2)$ gcloud compute addresses list
NAME                 ADDRESS/RANGE   TYPE      PURPOSE  NETWORK  REGION           SUBNET  STATUS
app-lb               35.223.27.28    EXTERNAL                    us-central1              RESERVED
jenkins-external-ip  34.64.237.112   EXTERNAL                    asia-northeast3          IN_USE
rancher              34.64.228.193   EXTERNAL                    asia-northeast3          IN_USE
이후에 배포 할 서비스의 메니페스트 파일에 spec.loadBalancerIP항목을 정의하여 LB IP를 고정하여 넣어주어야 합니다.
- GCP의 경우 LoadBalancerIP 항목을 명시해주면 자동으로 매칭되어 서비스가 올라옵니다!
apiVersion: v1
kind: Service
metadata:
annotations:
    cloud.google.com/neg: '{"ingress":true}'
    field.cattle.io/publicEndpoints: '[{"addresses":["35.223.27.28"],"port":8080,"protocol":"TCP","serviceName":"cd-test:app","allNodes":true}]'
    kompose.cmd: kompose convert
    kompose.version: 1.21.0 (992df58d8)
labels:
    io.kompose.service: {{ .Values.name.app }}
name: app-lb
namespace: {{ .Values.namespace }}
spec:
externalTrafficPolicy: Cluster
ports:
- name: "8080"
    port: 8080
    protocol: TCP
    targetPort: 8080
selector:
    io.kompose.service: {{ .Values.name.app }}
sessionAffinity: ClientIP
type: LoadBalancer
loadBalancerIP: 35.223.27.28    <<<<이부분>>>>
Service의 배포가 완료되면 아래와 같이 App-lb가 IN_USE로 바뀐 것을 확인할 수 있습니다.
h43254@cloudshell:~ (nasa1515-nov2)$ gcloud compute addresses list
NAME                 ADDRESS/RANGE  TYPE      PURPOSE  NETWORK  REGION           SUBNET  STATUS
app-lb               35.223.27.28   EXTERNAL                    us-central1              IN_USE
jenkins-external-ip  34.64.237.112  EXTERNAL                    asia-northeast3          IN_USE
rancher              34.64.228.193  EXTERNAL                    asia-northeast3          IN_USE
또한 k8s 클러스터에서도 해당 LB IP로 서비스가 정상적으로 생성됨을 확인!
h43254@cloudshell:~ (nasa1515-nov2)$ kubectl get svc -n cd-test
NAME     TYPE           CLUSTER-IP    EXTERNAL-IP    PORT(S)          AGE
app-lb   LoadBalancer   10.0.30.127   35.223.27.28   8080:32530/TCP   9m2s
mysql    ClusterIP      10.0.24.243   <none>         3306/TCP         18h
- 처음에는 Kubernetes의 Helm으로 ZAP을 배포하려고 했었지만 URL을 읽어오는 SPIDER등의 설정 가이드가 많이 부족해서 Jnekins와 연동하기로 했습니다
제일 처음으로 가장 최신 릴리즈 버전의 ZAPPROXY를 다운받습니다.

이후 다운받은 Zip파일을 Jenkins 인스턴스에 복사합니다.
[root@jenkins bin]# pwd
/usr/local/bin
[root@jenkins bin]# ls -alrt ZAP_D-2020-10-26/
total 5472
-rwxr-xr-x. 1 jenkins jenkins    4187 Feb  1  1980 zap.sh
-rw-r--r--. 1 jenkins jenkins  123778 Feb  1  1980 zap.ico
-rw-r--r--. 1 jenkins jenkins 5440213 Feb  1  1980 zap-D-2020-10-26.jar
-rw-r--r--. 1 jenkins jenkins     206 Feb  1  1980 zap.bat
drwxr-xr-x. 2 jenkins jenkins     161 Feb  1  1980 xml
drwxr-xr-x. 3 jenkins jenkins      23 Feb  1  1980 scripts
-rw-r--r--. 1 jenkins jenkins    2157 Feb  1  1980 README
drwxr-xr-x. 2 jenkins jenkins    4096 Feb  1  1980 plugin
drwxr-xr-x. 2 jenkins jenkins     265 Feb  1  1980 license
drwxr-xr-x. 2 jenkins jenkins    4096 Feb  1  1980 lib
drwxr-xr-x. 2 jenkins jenkins    4096 Feb  1  1980 lang
drwxr-xr-x. 2 jenkins jenkins     140 Feb  1  1980 db
drwxr-xr-x. 3 root    root         86 Oct 28 07:09 ..
drwxr-xr-x. 9 jenkins jenkins     180 Oct 29 10:40 .
복사가 끝났다면 Jenkins에 OWASP ZAP 관련 Plugin 들을 모두 설치합니다.
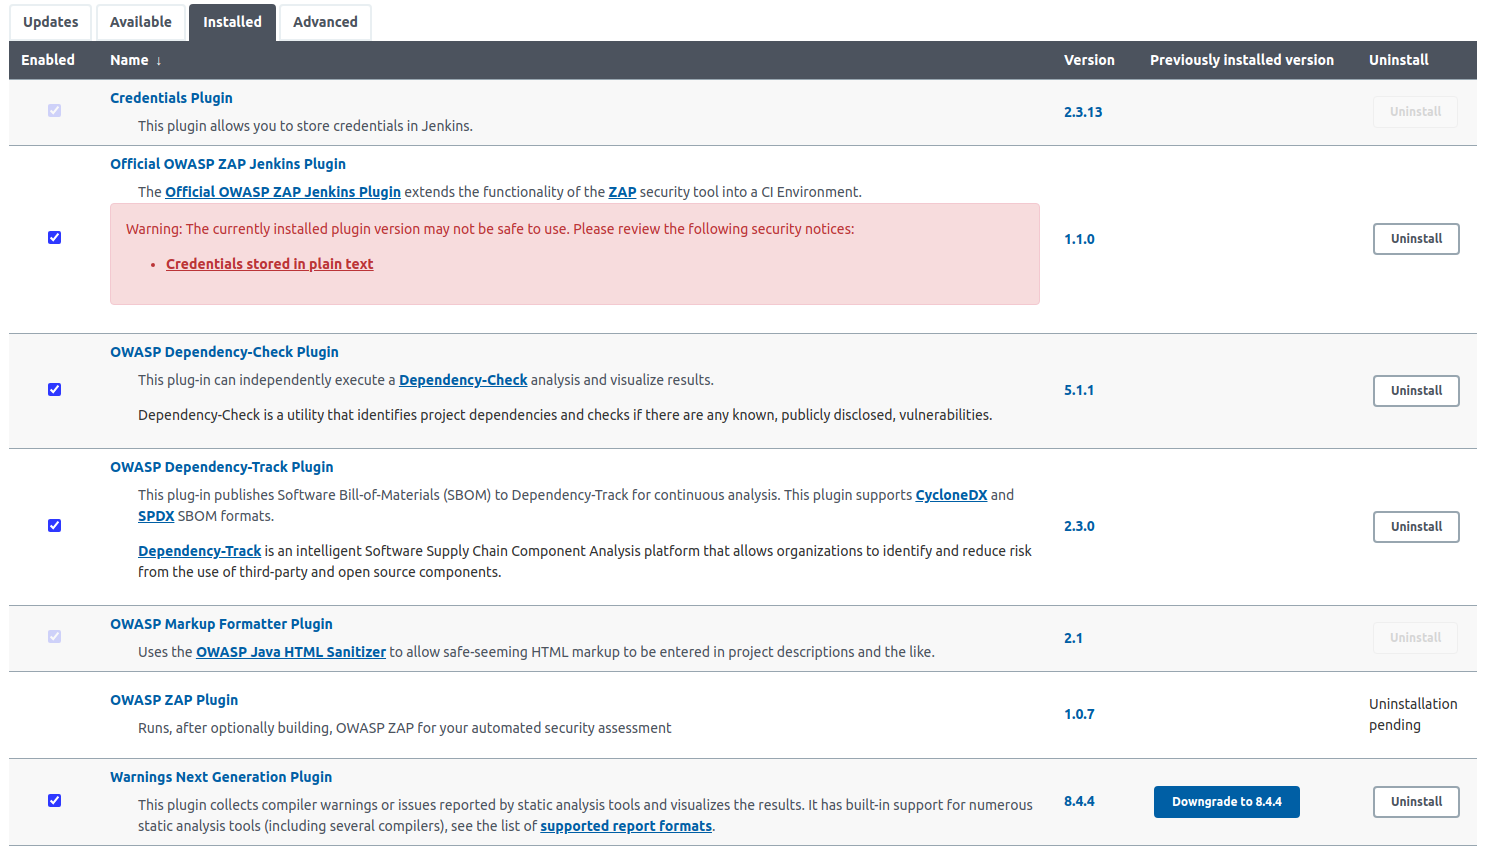
- Official OWASP ZAP Jenkins Plugin
- OWASP Dependency-Check Plugin
- OWASP Dependency-Track Plugin
- OWASP Markup Formatter Plugin
- JDK
플러그인이 설치가 완료되었다면 ZAP의 환경변수 설정을 합니다.
- Manage Jenkins -> configure System 탭에서 설정
미리 Jenkins 인스턴스 내에 Clone 해놓았던 zap.sh 스크립트가 존재하는 위치 지정

- Environment variables : 체크
- List of variables.name : ZAPROXY_HOME -> 나중에 프로젝트에서 설정할 위치
- List of variables.Value : 실제 Jenkins 서버의 zap.sh 스크립트 위치.
ZAP PROXY 설정

- Default Host : Jenkins 서버의 로컬로 돌리기 위한 값.
- Default Port : Jenkins 서버에서 동작할 Port 번호
환경변수 설정 후 freestyle의 프로젝트를 생성합니다.

이후 Build tab에서 Excute ZAP을 추가해 Zap PROXY의 설정을 해줍니다.
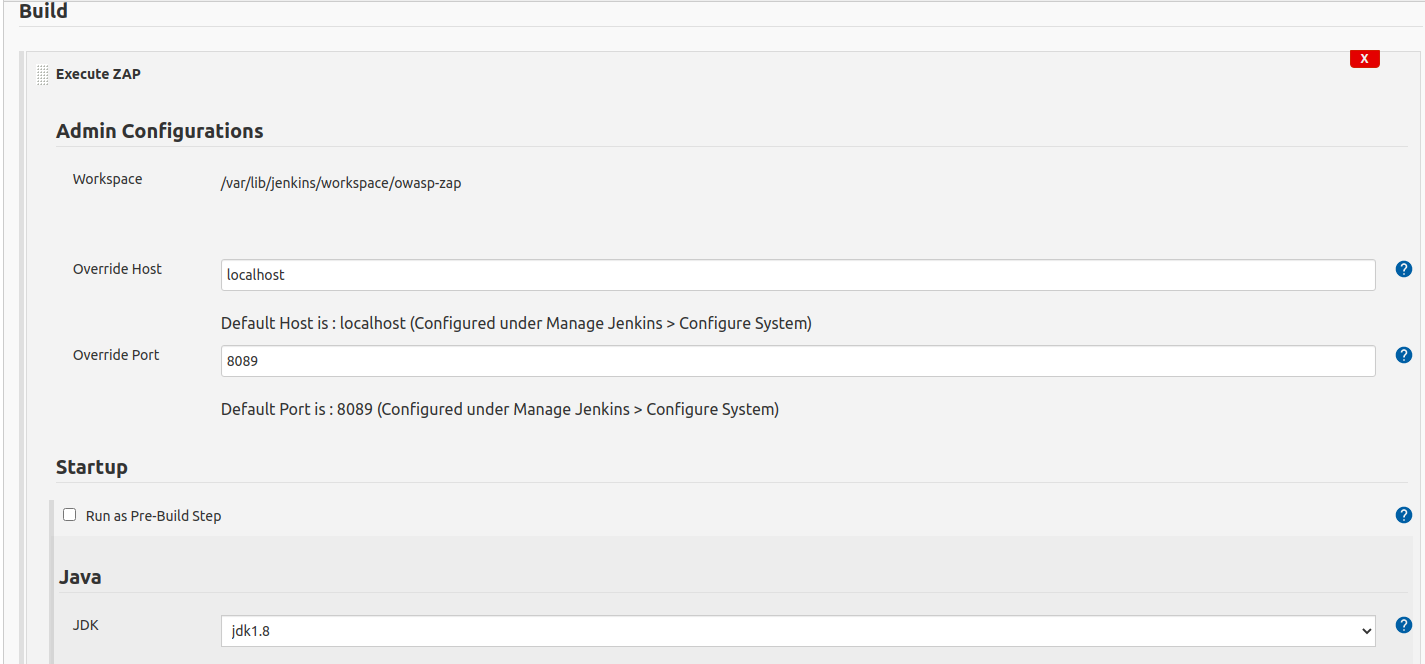
- localhost : Jenkins 서버의 로컬에서 동작.
- override Port : Jenkins 서버에서 동작할 Zap의 사용포트
- JAVA : OWASP ZAP은 JAVA기반으로 돌기때문에 JDK 플러그인의 추가 설치가 필요합니다
이제 ZAP의 실행 Method의 관련 설정을 해줍니다.
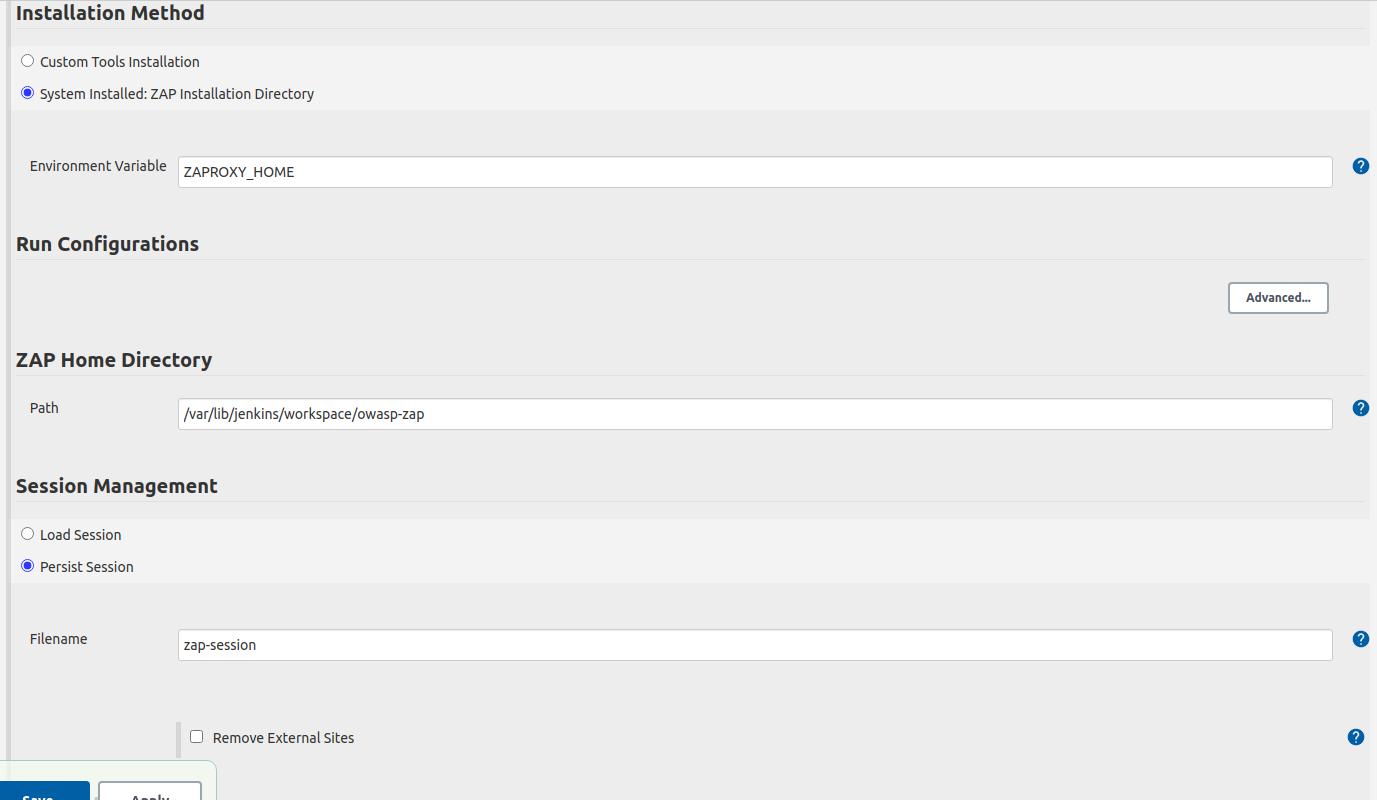
- Environment Variable : 이전에 설정했던 OWASP ZAP의 환경변수 값 기입
- ZAP Home Directory : Jenkins 서버에 미리 Clone 해놓은 Zap.sh 파일의 위치 기입
- Filename : job-seesion으로 default 잡아주면 됩니다
이제 Session Properties 설정을 해줍니다.
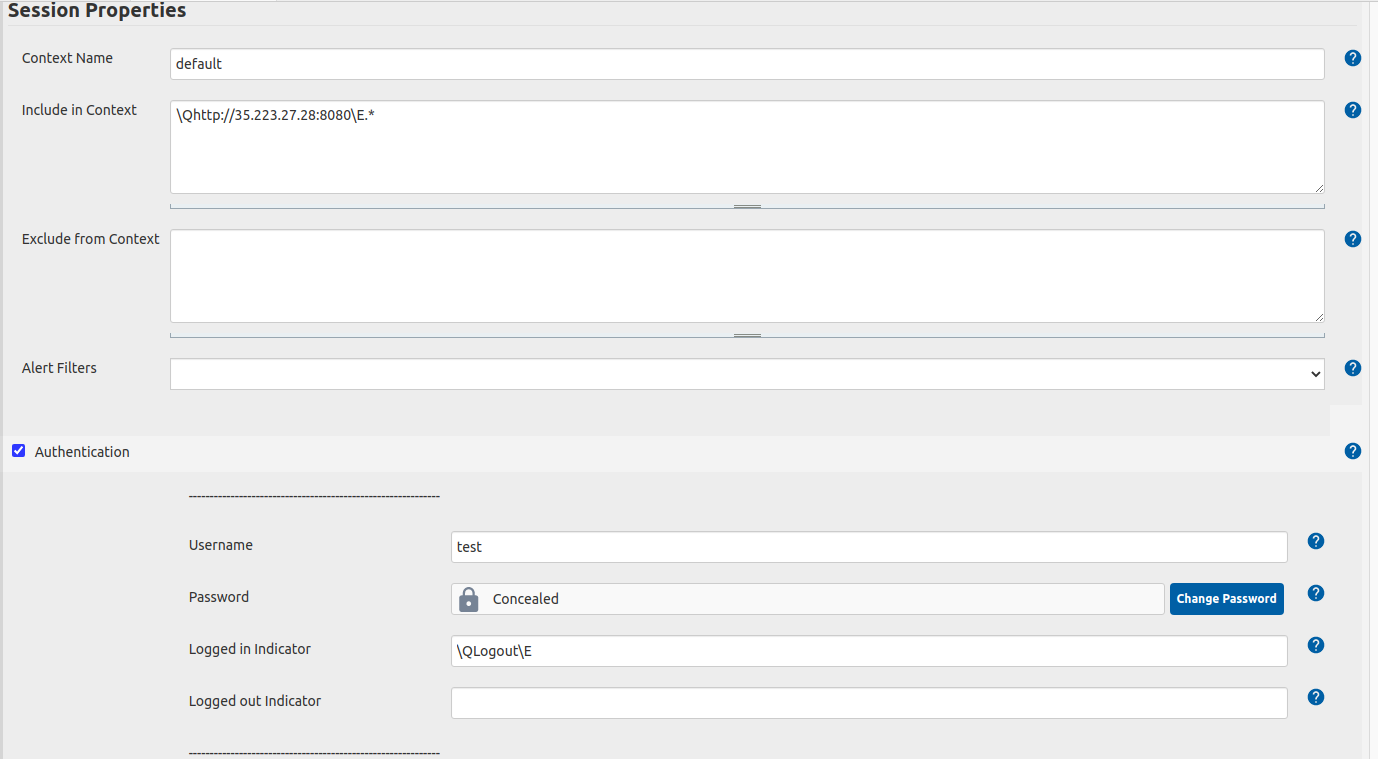
- Context Name : default로 컨택스트를 잡아주면 됩니다.
- Include in Context : 검사할 URL의 주소를 넣어주면 됩니다
- Username : 실제 사이트에 들어가기 위한 Account User 정보
- Password : Account User의 PASSWORD 정보
- Logged in Indicator : 스캔을 마치고 나올 메세지를 적으면 됩니다
\QLogout\E
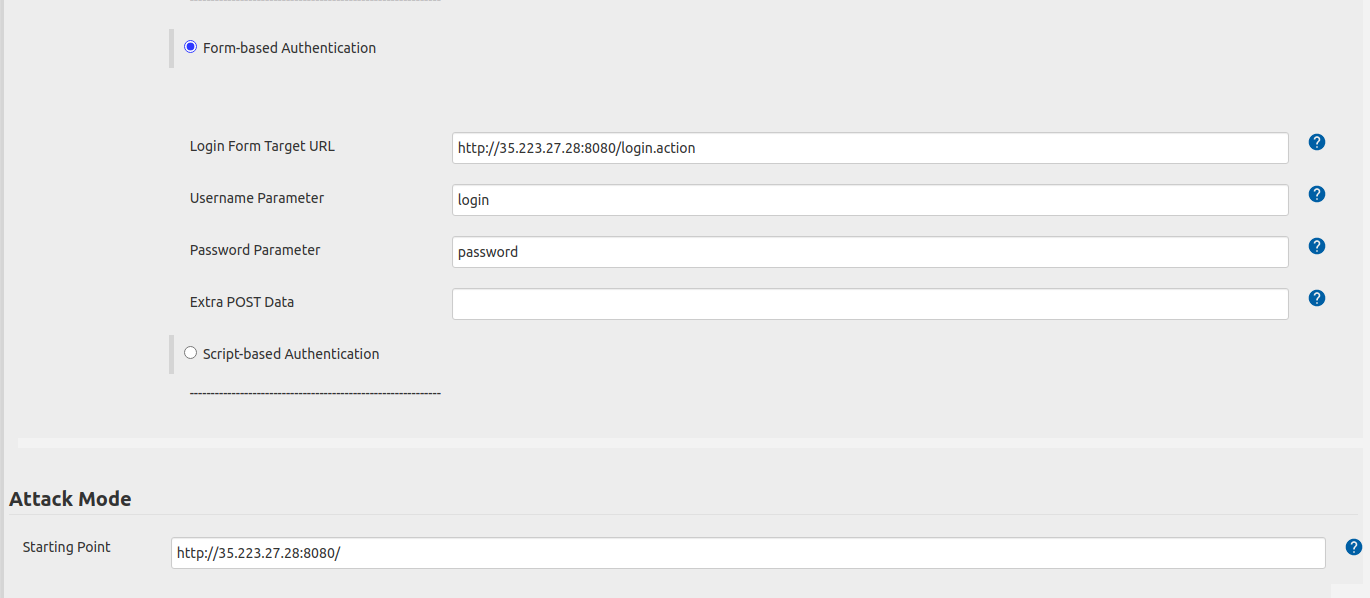
- Login Form Target URL : 로그인 Parameter를 기입할 URL 주소를 기입
- Username Parameter : Username Parameter 값을 기입해줍니다.
- Password Parameter : Password Parameter 값을 기입해줍니다.
- Attack Mode.Starting Point : 스캔할 URL의 가장 초기 URL을 적어줍니다.
바로 아래에 있는 Spider Scan 설정도 추가해줍니다.

- Spider Scan : 체크
- Recurse : 체크
- Subtree Only : 체크
- Active Scan : 체크
- Policy : default Policy 로 설정
- Recurse : 체크
스캔 결과의 리포트 파일을 남기기 위해서 Generate Reports 설정을 추가합니다.
- Generate Reports : 체크
- Clean Workspace Reports : 체크
- Filename : ~ {BUILD_ID} 빌드 넘버로 남기기 위한 설정
Report 파일의 형식이 다음과 같음을 확인합니다.

- Generate Report : xml, html 설정 확인
POST Build ACTION을 설정해줍니다.
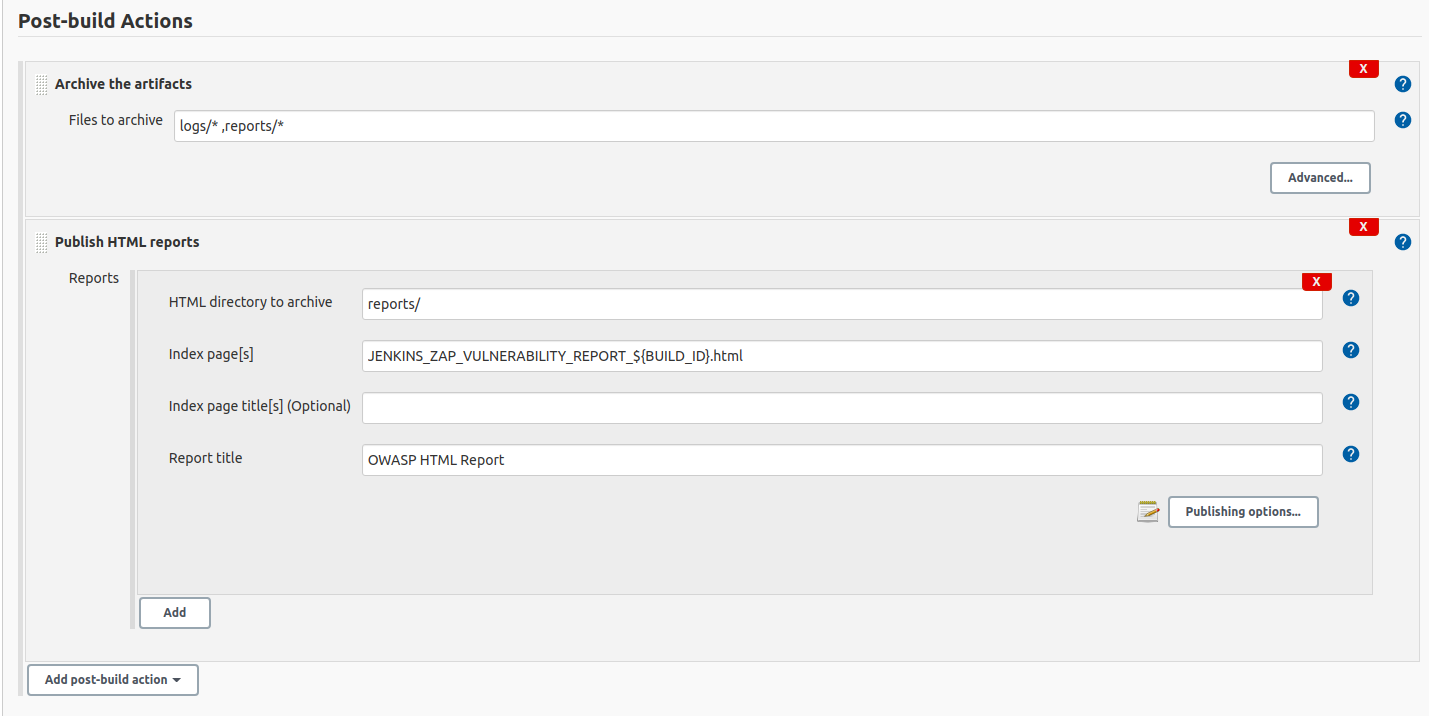
- Files to archive : 결과 파일로 띄워줄 로그와 리포트 파일의 위치.
- HTML directory to archive : Report 파일의 디렉토리 기입
- Index page[s] : 위에서 생성해줬던
[REPORT 파일명].html 기입. - Report title : html로 띄워줄 리포트 결과의 제목
Jenkins의 OWASP ZAP 프로젝트에서 빌드!
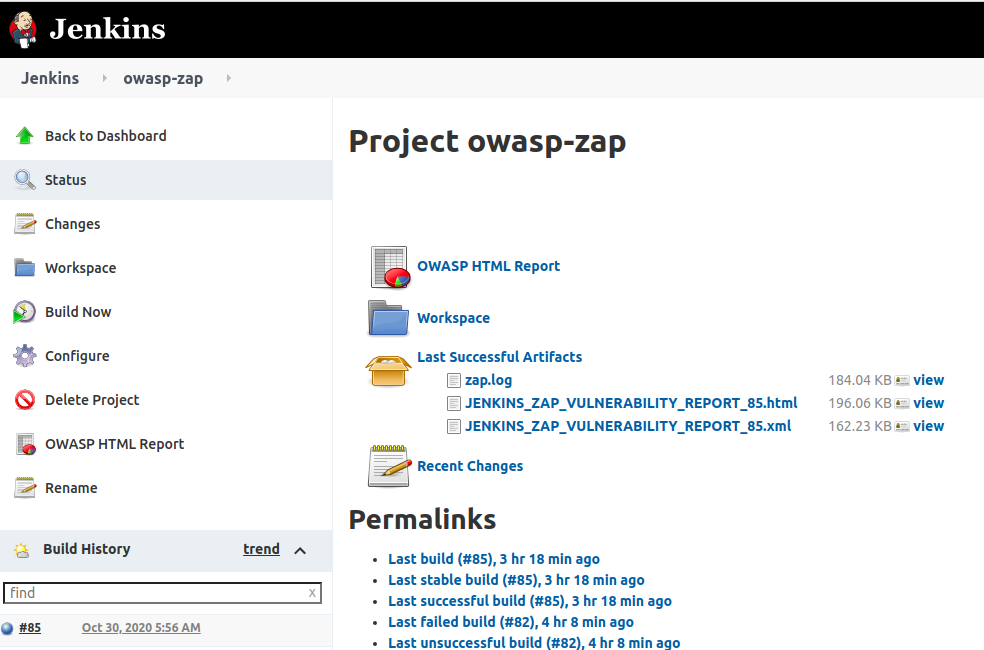
- 빌드가 완료되면 위의 그림과 같이 html,xml 로그가 생성됩니다.
실제 해당 Report 파일에 접속하면 아래와 같은 형식으로 리포트 해주는 것을 확인가능합니다.
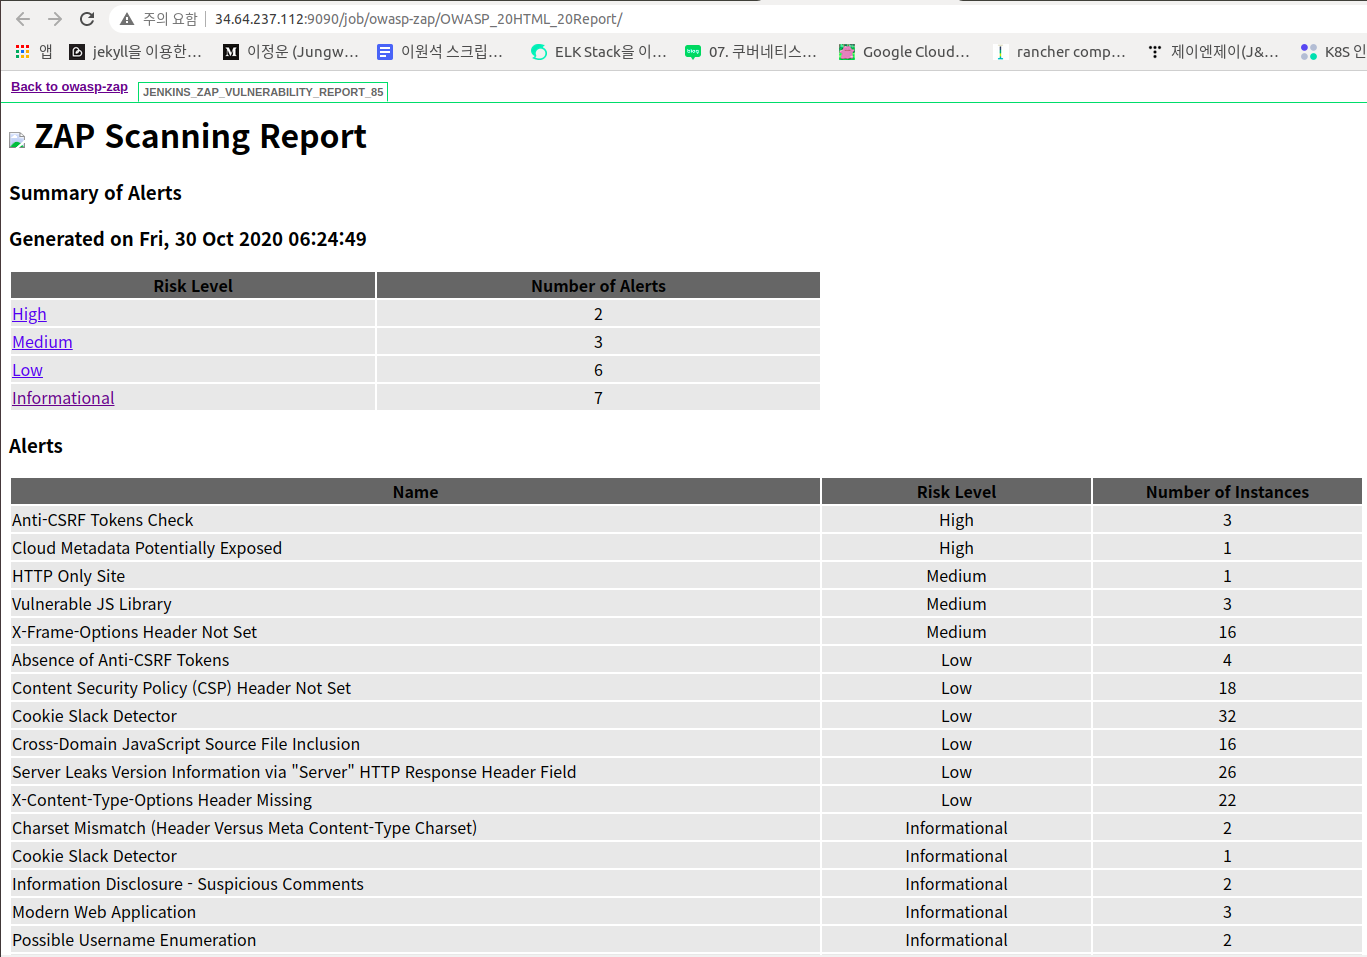
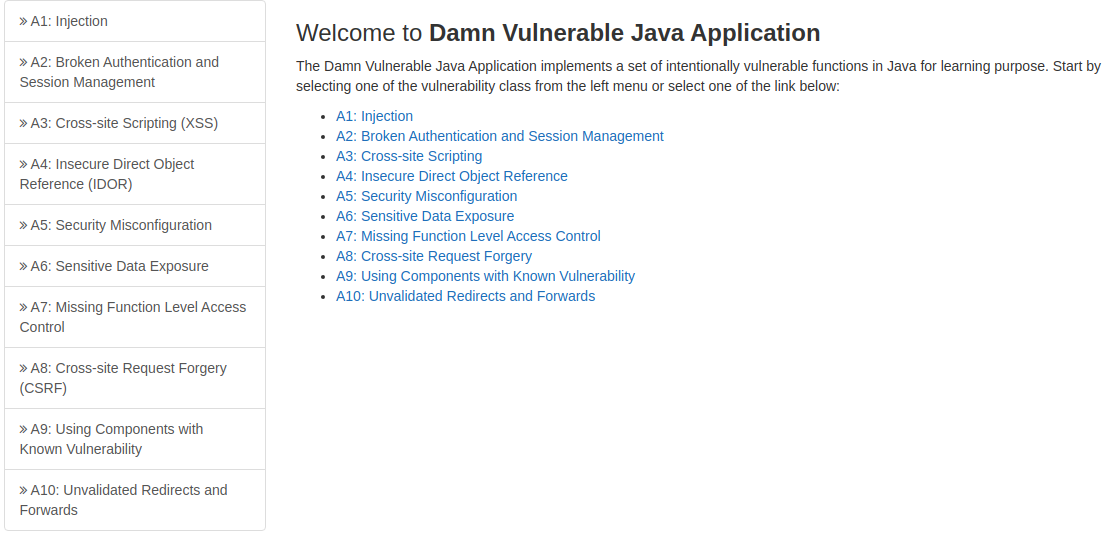
리포트 파일을 확인해보면 홈페이지의 A1,A2등의 취약점 검사를 자동으로 한 것이 확인가능합니다.

실제 동작은 해당 웹페이지에 user, password를 자동으로 기입해주고
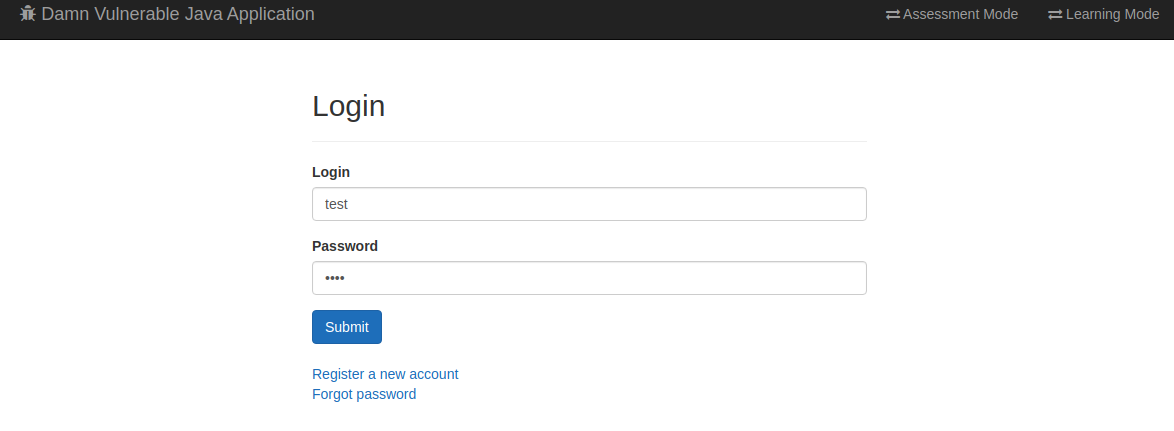
메인 페이��지에 연결되어있는 1~10까지의 보안취약점에 대해 자동으로 스캔을 해줍니다.
![[DevOps] DevSecOps 파이프라인: Jenkins와 OWASP ZAP을 활용한 코드 보안 테스트 통합 자동화 파이프라인 구축](/static/3a28c5196162e5a21137cfab5d859b78/e9ac0/owaspzap.png)
![[DevOps] DevSecOps 파이프라인: Jenkins와 OWASP ZAP을 활용한 코드 보안 테스트 통합 자동화 파이프라인 구축](/static/3a28c5196162e5a21137cfab5d859b78/e9ac0/owaspzap.png)


![[DevOps] Maven을 사용한 Java Application 빌드 및 배포 & DevSecOps Pipeline 통합 및 자동화 고도화](/static/ca755099df42e3fa0b61a8935683fe2e/f2752/DevOps.jpg)
![[DevOps] Private Docker Registry Harbor 도입으로 DevOps 고도화 & Jenkins와 ArgoCD에 연동 및 통합](/static/9b509d4819eb8d9589ca27dd10aadc18/f6053/harbor.png)
![[DevOps] Jenkins Build Pipeline 최적화: SonarQube 연동 및 통합으로 코드 품질 관리 자동화](/static/fa0110a3da2d89849604f1f139852e8b/04c11/sonarqube.png)
![[DevOps] DevSecOps 파이프라인: Jenkins에 Anchore를 활용한 Docker 이미지 스캔 Test 통합 Build 자동화](/static/9f7ede338f0292b6c2090dffa029c347/97f9c/anchore.png)
![[DevOps] GCP Filestore로 Kubernetes NFS PV Volume 구축 & ReadWriteMany 문제 해결 및 성능 및 관리 최적화](/static/a245cf55f04280b6854c35ffb8c38a33/1982e/filestore.png)
![[DevOps] Helm을 활용한 Kubernetes 매니페스트(Manifest) 파일 관리 및 배포 자동화 최적화 파이프라인 구축](/static/652b55e9ea0b2e7b9bc1dbcdcb83123b/b1b94/helm.png)